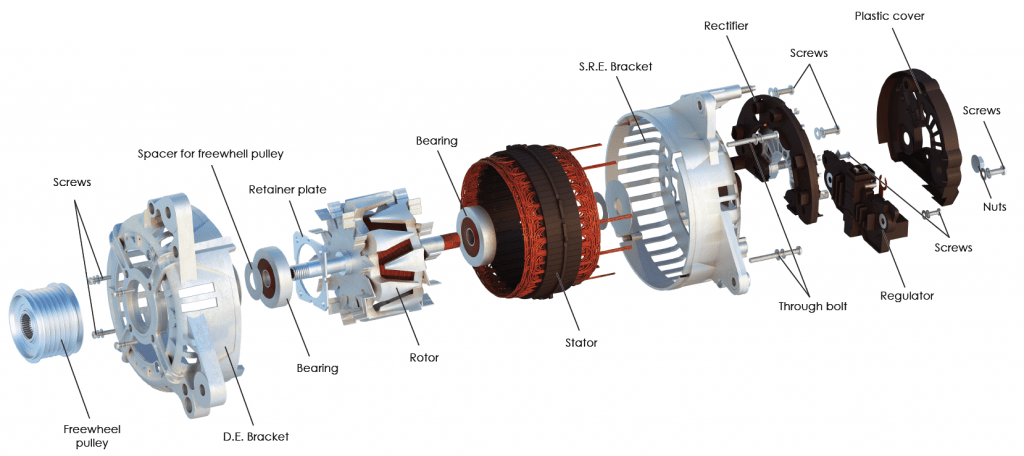
The purpose of an alternator is to convert mechanical energy into electrical energy in the form of alternating current.
The first alternating current (AC) power system was constructed in 1891 by Mr. Nicola Tesla.
The alternator is used as a power source in motor vehicles and is designed to charge the battery.
In it, current is generated in the stationary stator windings by the rotating magnetic field of the rotor.
The modern type of automobile alternator was first used by the military during World War II and was used to power radio equipment.
In 1960, the alternator became standard equipment on the Chrysler automobile.

The alternator, due to the nature of its operation and close interaction with other systems, is subject to various types of failures.
Some of them may result from the wear of components, such as brushes, wear rings or bearings.
Semiconductor components (regulator, diode rectifier) can also be damaged.
Failures require diagnosis by a repair service.
However, some alternator problems can be diagnosed on your own without removing the part from the car engine.
How to diagnose alternator problems
All you need to do is to have and know how to use a multi-band voltmeter.
First, measure the voltage at the battery terminals.
This should be done before starting the engine.
Write down the voltage value.
Switch the ignition on, but do not start the engine.
If the “No Charge” light appears, this is correct.
If the “No Charge” light does not appear, it may indicate a defective alternator or a malfunctioning system.
If the “No Charge” light is visible, start the engine and observe if the light goes out.
Allow the engine to run quietly without applying any load.
For a preliminary assessment of alternator activity, we again measure the voltage at the battery terminals.
With no load applied, the voltage should be higher than 13V at idle.
If it is, the alternator is active, if not, that’s enough information to determine its proper operation.
Further tests are designed to check the efficiency of the alternator in case we still have doubts about its full operation.
They are carried out with an increased load on the alternator.
For this purpose, we turn on the blower and rear window heater and keep the engine revs at 2,000 rpm (that is twice as
much as the so-called idle gear).
Again, measure the voltage at the battery terminals.
With proper alternator operation, the voltage should be no less than 13.4V.
If it is, then with a high degree of probability, the alternator is in good working order.
However, if the measured voltage is lower than these values or the “No Charge” light is still on, it indicates a problem in the system related to the battery charging circuit. However, this is not necessarily due to a faulty alternator.
A few more steps and measurements are necessary to diagnose the cause.
First, we check for proper wiring connections at the alternator.
Next, analyze the noises the alternator makes during operation.
If the noise is unusual, it may be a defective rectifier diode, bearing, or stator winding.
We also verify the tension of the drive belt.
If it is too loose, it prevents the alternator from reaching its full current output.
If the alternator has an overrunning pulley (also known as a freewheeling pulley), observe whether the alternator rotor turns in line with the rotation of the alternator pulley.
With some pulley failures, the alternator rotor will not be driven despite the rotation of its pulley.
On the other hand, to check the proper operation of the power system, voltage measurements are taken when loads are switched on.
Measurements are taken directly at the alternator terminals (relative to the alternator housing) and at its clamps.
Then compare the results of both measurements.
The difference between voltmeter readings should not be greater than 0.1V, if the electrical system is working properly.
If it is greater, it indicates defects in the installation.
It can be: poor condition of the clamps on the battery terminals, no ground on the engine body, a faulty connected
alternator, etc.
Still, it may be that the alternator is in good working order.
If we have not been able to determine the cause of the malfunctioning alternator, you will need to visit a repair service.


Home Page › Forums › How to diagnose alternator failure without removing it